
QuickStart for New Users
While there are many ways to interact with the Space and Time network, the Studio dapp is the easiest.
Welcome to Space and Time! This quick start guide will walk through creating a new user, running your first few queries, and creating and/or joining a subscription.
All steps below can be completed using SxT API, CLI, or SDKs. That said, using the Space and Time Studio UI is the easiest method by-far, so this guide will focus on that path.
Create a New User
The UserID is your gateway into the Space and Time network. You use it to authenticate, to execute queries, hold funds, and join a subscription to work together with others.
A few noteworthy attributes of a Space and Time UserID:
- They are globally unique - lock up your favorite early!
- They are case sensitive - Suzy and suzy and SUZY are all different Usernames. If you get an error logging in, check your case.
- Allow alpha-numeric, and underscore - so Susy and Susy01 and Susy_Creamcheese are all fine, but [email protected] is invalid.
- They are free - you can create a trial user today which has 100 free queries, and add a subscription later.
- Wallet Addresses are considered keys, not a UserID - meaning you can have multiple wallets and ED25519 keypairs associated with your UserID. It's a best practice to keep UserIDs human readable, and add keys / wallets as appropriate.
Let's Go!
When creating a new user, you can choose to login with your wallet, or with a username / password. Ultimately you can configure your account to use either / both, so which you start with doesn't matter.
Create a new user with a username / password
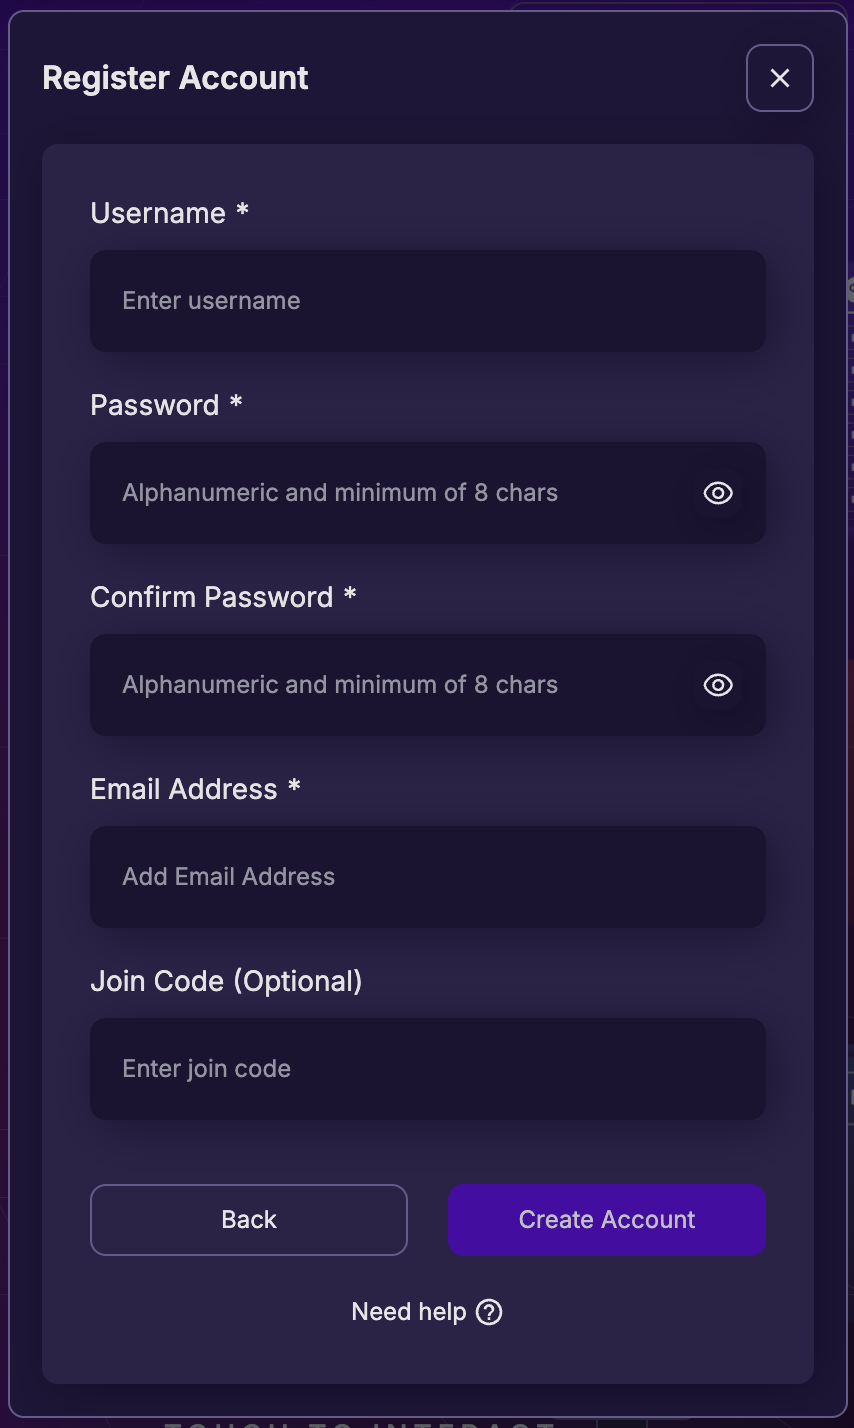
Once you confirm your email, your account setup is fully complete and you'll have access to your free 100 trial queries!
Create a new user with a web3 wallet
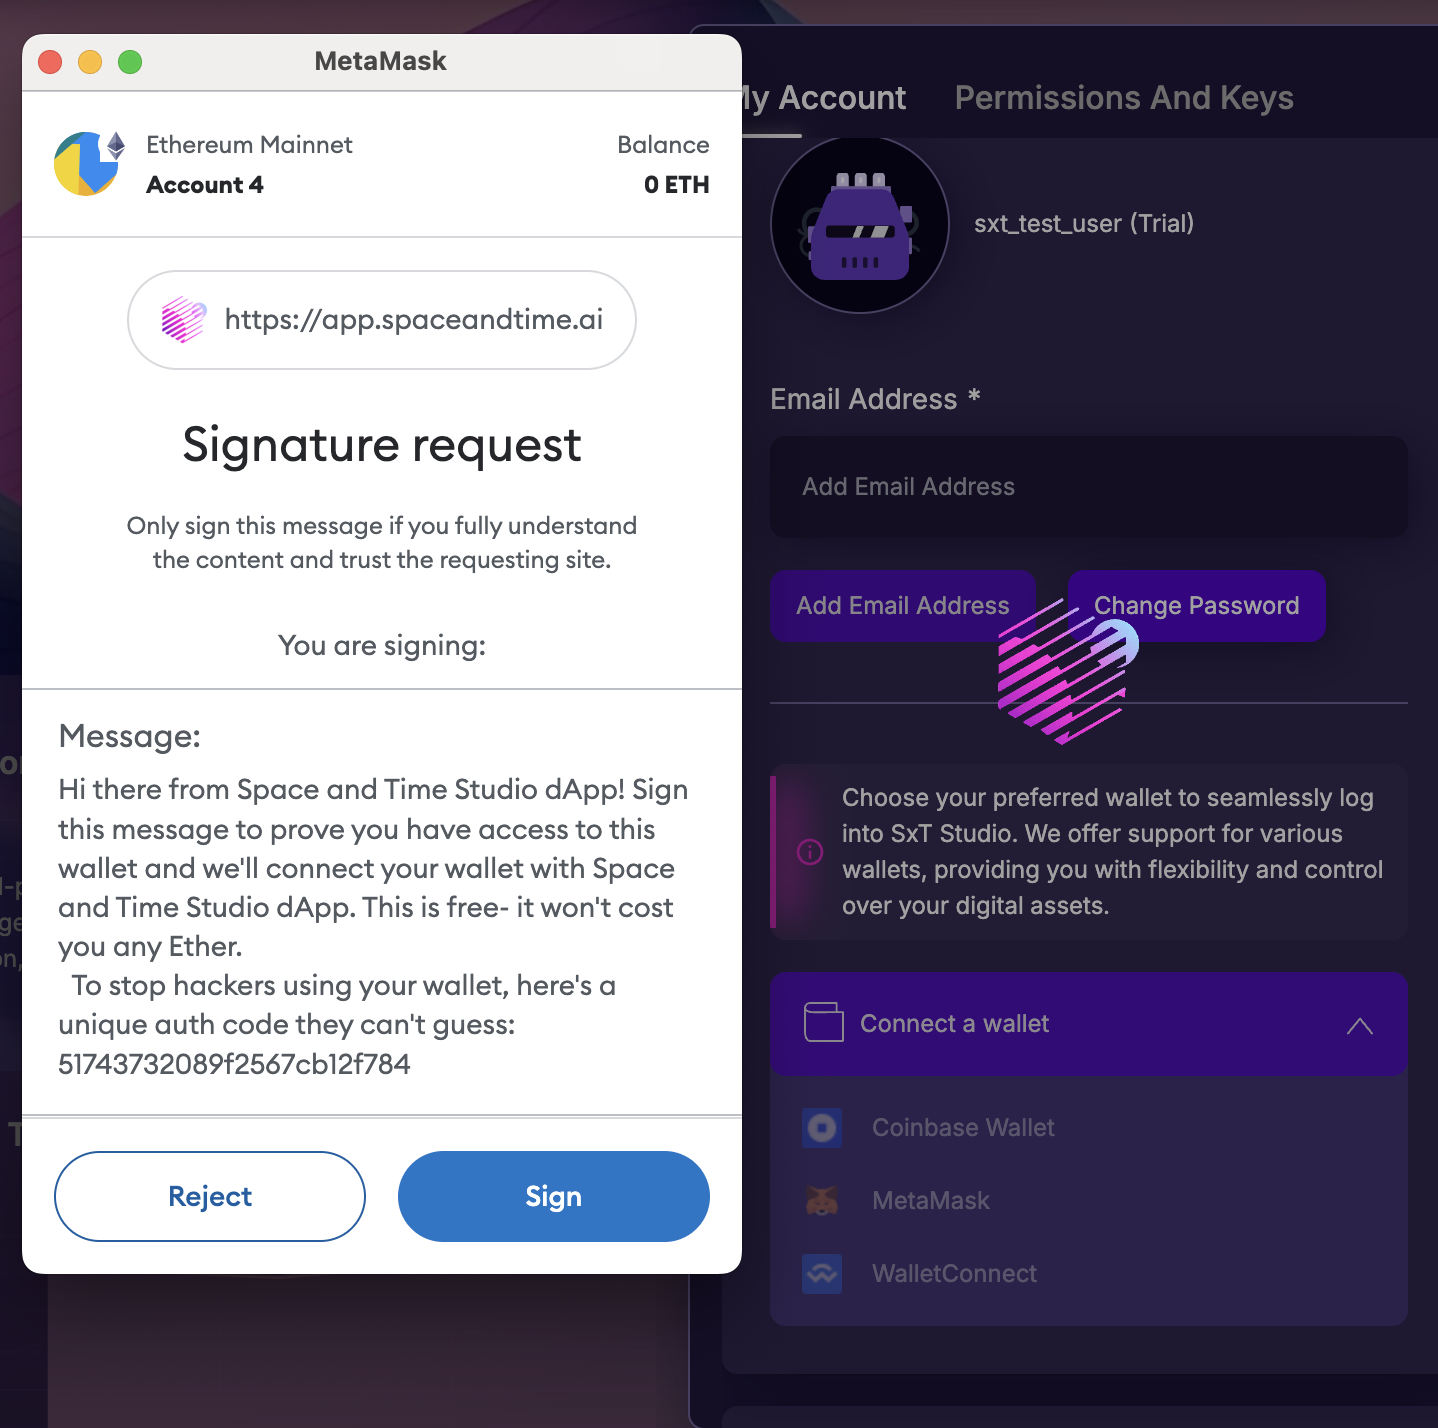
If you prefer, you can create a UserID using a web3 wallet first, rather than a UserName / Password. The outcome of both workflows is the same. To create a net-new user with a wallet address:

Sign the signature request, and your account is created and associated with your wallet address! You can now login with your Web3 wallet!
Once you confirm your email, your account setup is fully complete and you'll have access to your free 100 trial queries!
You can add an optional password later, under "My Account" // "Account Settings" // "Profile". This (along with Email) is useful for recovering your account after a lost key or password.
Congrats! You just created a Space and Time User!
Add a New API Key for API Access
Often developers prefer a simple, application centric authentication method such as an API Key. Fortunately, Space and Time makes it very easy to generate and manage API Keys using Space and Time Studio!
To Generate or Manage API Keys:
-
Navigate to Space and Time Studio, click on "Sign in" in the upper-right most corner, and login.
-
Click on "My Account" in the upper-right most corner (replaces "Sign in") and click on the "Permission and Keys" tab.
-
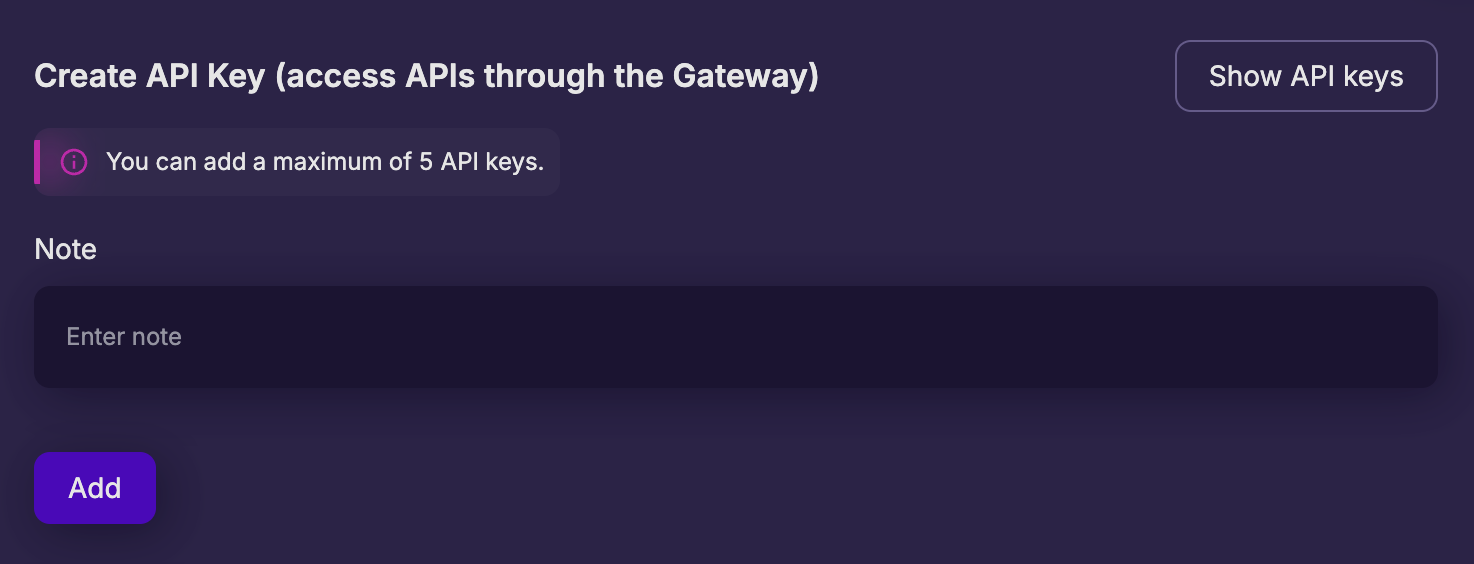
On that tab, you will see an API Key section. If you have no defined API Keys, the UI will display the "Create API Key" view:
-
To create a new API Key, simply add a note (to remind yourself where/how the key will be used) and click "Add"
Copy and save your API Key! It will never be shown again! If you forget to copy, you'll have to delete and re-create a new key.
Congrats! You've just created your first API Key!
If you have existing keys, you should see the "API Key" management view instead:
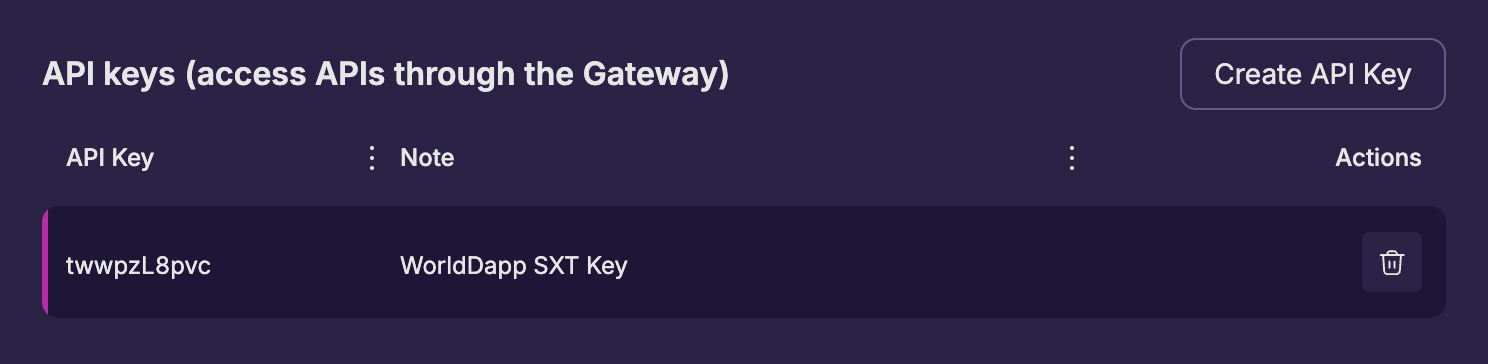
From here, you can see existing keys and delete keys (using the trash-can icon on the right).
What is the difference between API Keys are Access Tokens?
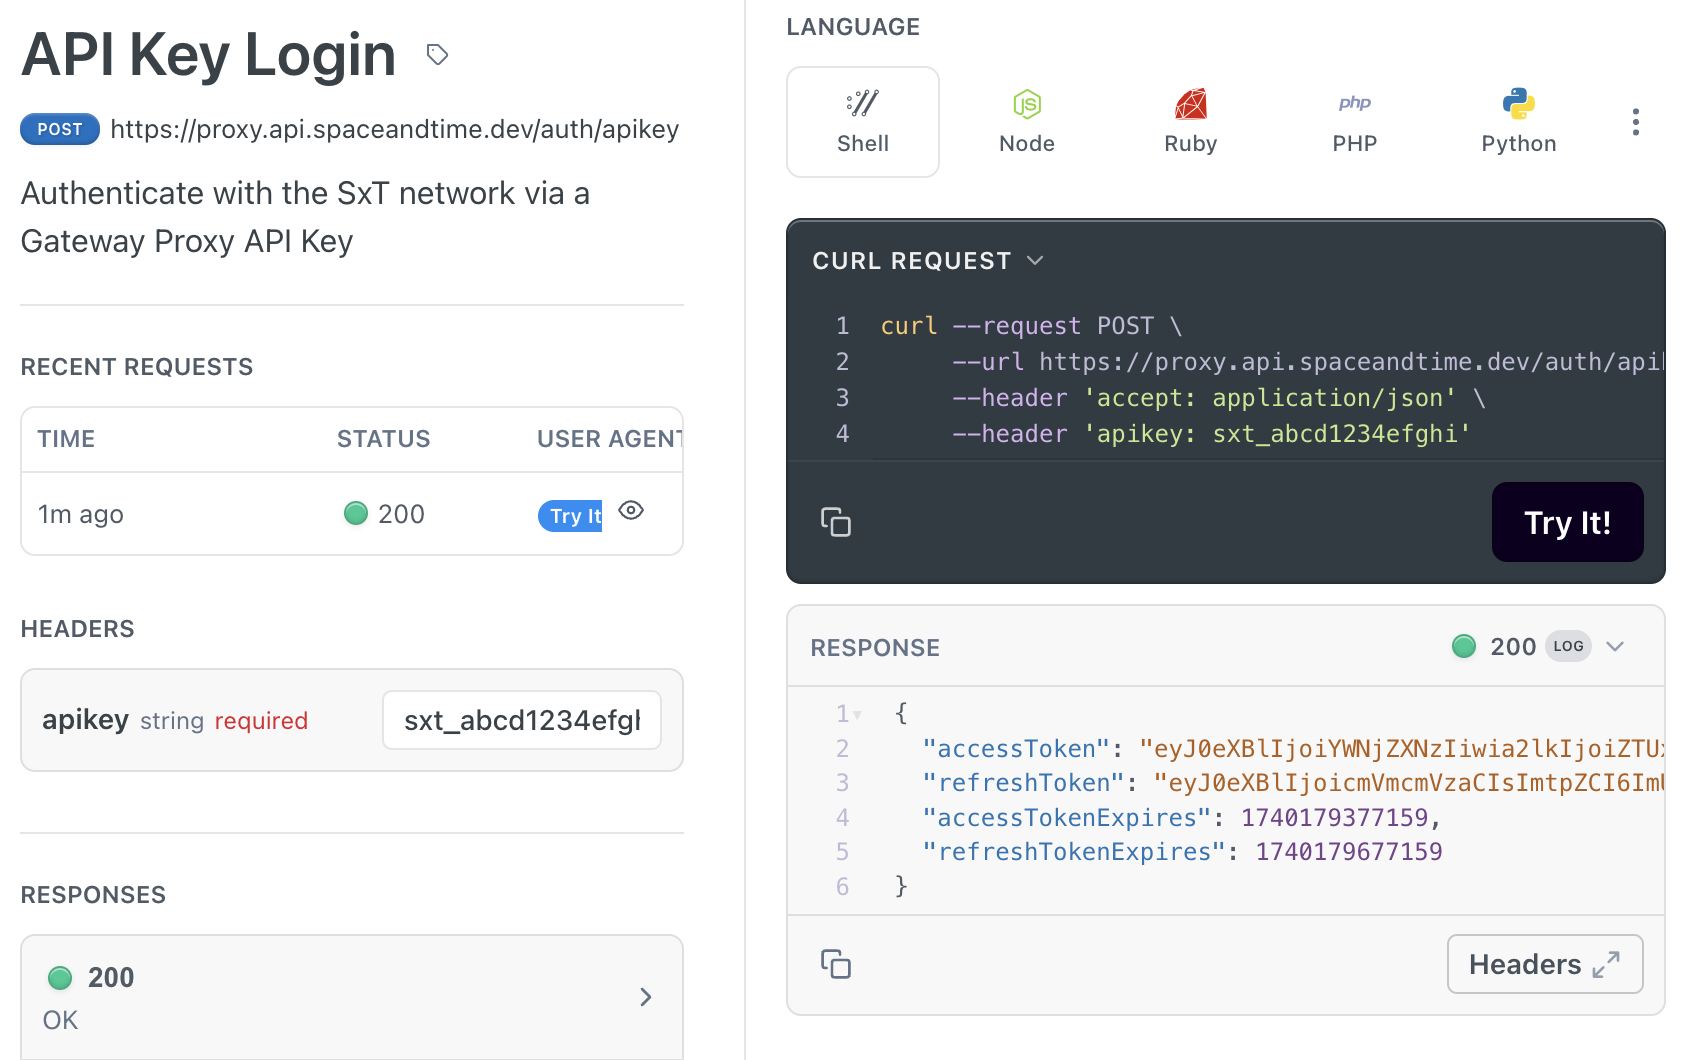
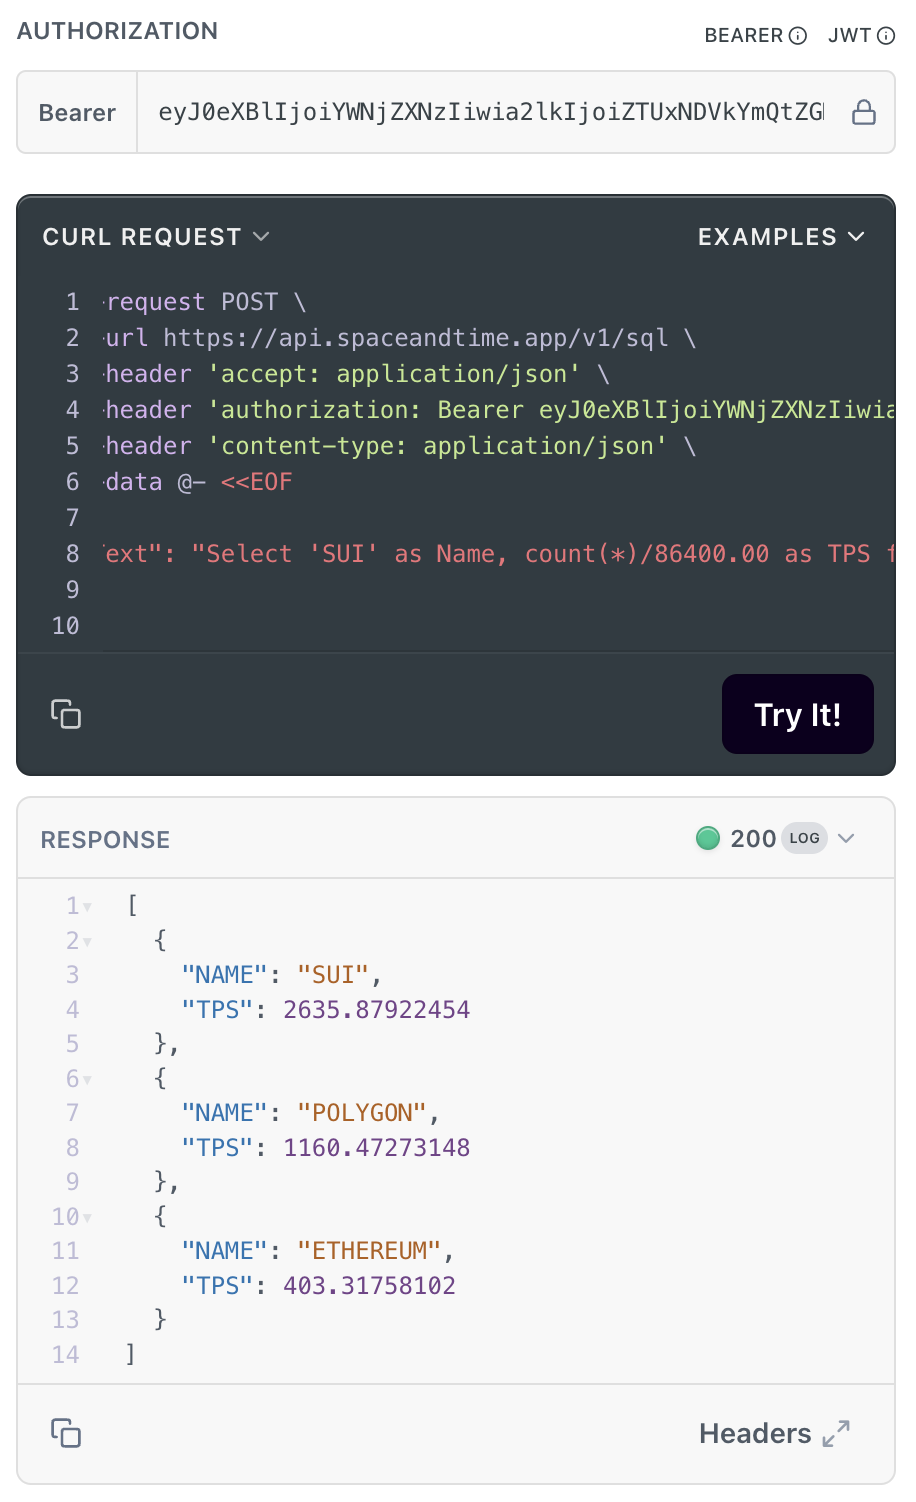
You can always use your authenticated API Key to request a full network ACCESS_TOKEN, allowing your application access to the entire suite of decentralized network APIs using an API Key.
Can I turn my API Key Authorization into an Access Token?
Quick example of running a query using an API Key
Let's run this fairly simple TPS comparative query for January, 2024 - first using the API Key directly, then again using the Decentralized Network.
Select 'SUI' as Name, count(*)/86400.00 as TPS from SUI.TRANSACTIONS
where time_stamp between '2024-01-01' and  '2024-01-31'
  union all
Select 'POLYGON' as Name, count(*)/86400.00 as TPS from POLYGON.TRANSACTIONS
where time_stamp between '2024-01-01' and  '2024-01-31'
  union all
Select 'zkSync' as Name, count(*)/86400.00 as TPS from zkSyncEra.TRANSACTIONS
where time_stamp between '2024-01-01' and  '2024-01-31'
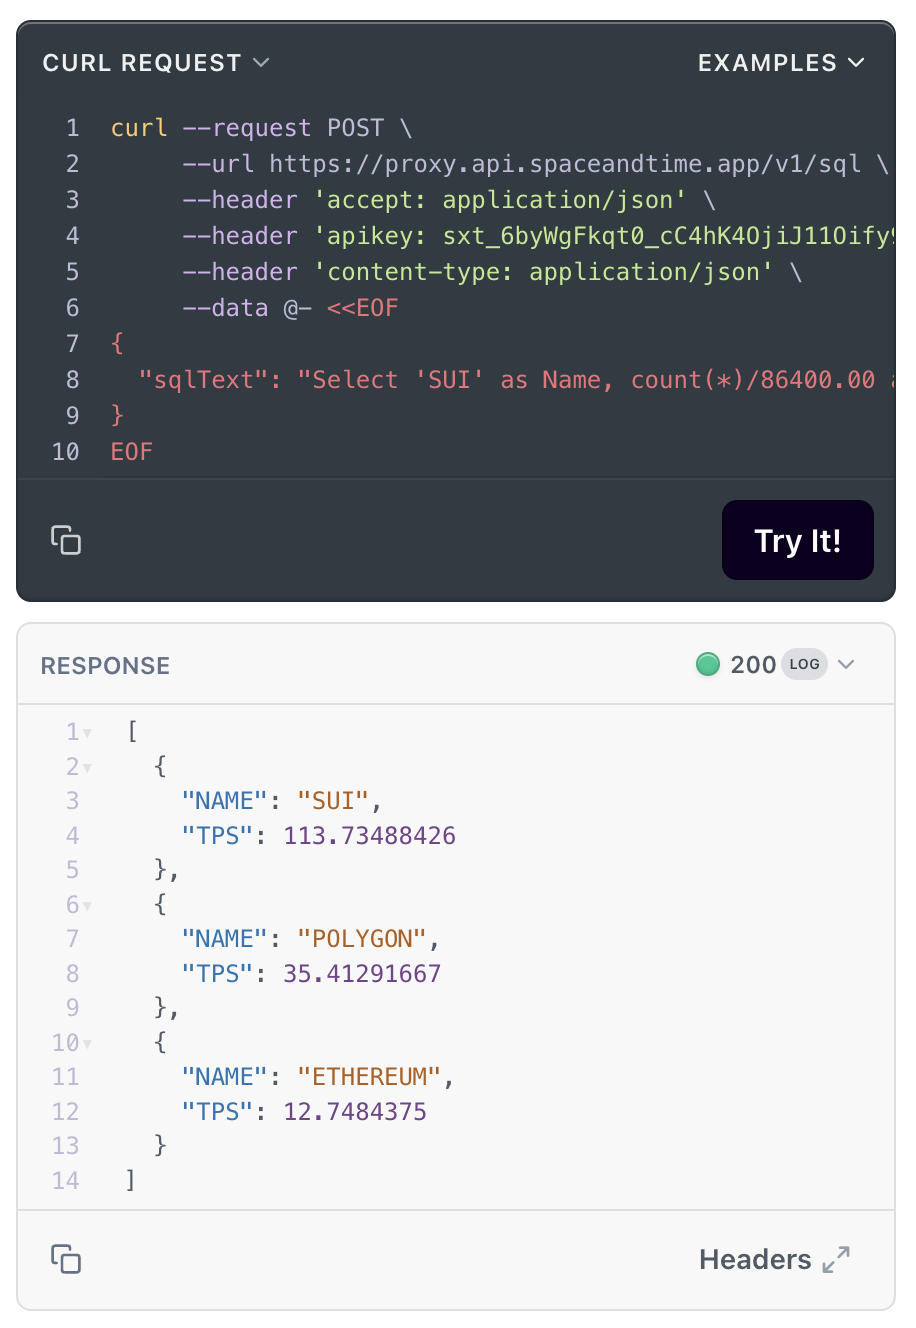
Congrats! You just ran a query using your API Key!
Space and Time provides API calls that allow you to exchange your Secrets Proxy API_Key, UserName/Password, or active Space and Time Studio SessionID for a decentralized ACCESS_TOKEN. This in turn allows you to operate any API on the entire Space and Time network.
Add a New Public/Private Keypair for decentralized API Access
If you plan to build applications or otherwise use any of the suite of Space and Time network APIs, you will need an ED25519 keypair associated with your UserID.
Curious On How Authentication Works?
The decentralized authentication is built on an ED25519 keypair challenge / response model, whereby the user or application requests and signs a challenge token with the local private key. The network then attempts to validate the with the pre-registered public key, and if successful, issues an ACCESS_TOKEN.
The steps for decentralized network authentication are as follows:
| Local / Client | Decentralized Network |
|---|---|
| Request a challenge token for a particular UserID | |
| Generates and returns a random challenge token for that UserID, which expires after 30 seconds | |
| Sign the challenge token with the UserID's private key, and returns the signed challenge to the network | |
| Authenticates the client's ownership of the UserID's private key by using the UserID's public key to validate the signed challenge, and returns an ACCESS_TOKEN (25 minute session), a REFRESH_TOKEN (30 minute time-out, for streamlined session refresh), and the epoch expiration time for both | |
| Any time before the Refresh Token times out, can request a refreshed Access Token, which again comes with a new Refresh Token | |
| Any session that has been active for 24 hours is terminated, forcing a full re-authentication |
Access Tokens ARE your session to the network. Never share or lose control of your Access Token, as it would allow others to issue commands to Space and Time network as you.
Adding a new ED25519 keypair to your account requires authenticating once (to verify you are in control of the UserID) then registering the locally generated public key. We'll use Space and Time Studio to authenticate and provide the ACCESS_TOKEN, which proves we are in control of the account. Then we can use that ACCESS_TOKEN and the SXTCLI to validate our account and register a new keypair.
To add a new ED25519 keypair to your account:
-
Make sure the Space and Time CLI is installed.
-
Open a terminal / command window and enter:
sxtcli authenticate keypair
...which should produce an output similar to...ED25519 KeyPair (base64) Private key: ft2oz41+aXy1KtAyNzGOqxnHGbNSSXV8xpxN6FpN8w= Public key: eIMaJpSbLC6jyAG9RfwvklgsXbDc/HI2eH7TitL2pA=Note: do not use the above keys - for proper security, please always generate your own new keys.
-
STOP NOW and save your new keys to a secure repository, such as an enterprise secrets manager or password manager. Like web3 wallets, lost keys cannot be recovered!
-
Navigate to Space and Time Studio, click on "Sign In" in the upper-right most corner, and log in with the same UserID which will receive the new keypair association.
-
Click on "My Account" in the upper-right (replaces "Sign In") and make sure you're on the "My Account" tab.
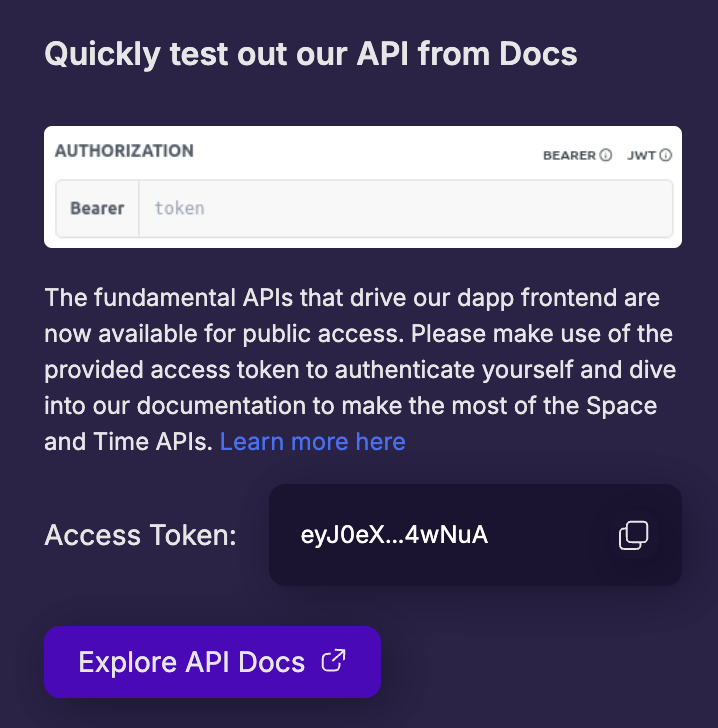
-
Scroll down to the section titled, "Quickly test out our API from Docs" and copy the "Access Token" show at the bottom:
-
Return to your terminal window and use the SXTCLI to complete the registration process:
export ACCESS_TOKEN="eyJ0eXBlIjoiYWNjZXNzIiwia2lkIjoiZTUxNDVkYmQtZGNmYi00ZjI4LT..." export USER_PUBLIC_KEY="ft2oz41taXy1KtAyNzGOqxnHGbNSSXV8xpxN6FpN8w" export USER_PRIVATE_KEY="eIMaJpSbLC6jyAG9RfwvklgsXbDcdHI2eH7TitL2pA" sxtcli authenticate keychain \ --accessToken=$ACCESS_TOKEN \ --url="https://api.spaceandtime.dev" \ add \ --privateKey=$USER_PRIVATE_KEY \ --publicKey=$USER_PUBLIC_KEY- Paste your ACCESS_TOKEN over the sample in line 2
- Paste your Private Key over the sample in line 5
- Paste your Public Key (wallet address) over the sample in line 6
- All other parameters can be left to default
If successful, you'll receive the message: key added to keychain.
Congrats! You've successfully added a new keypair to your UserID's keychain!
You can add as many keypairs to your keychain as you'd like. For more information, check out this detailed article on connecting to the decentralized network.
To align with security best practices, Space and Time will never transmit your private key. Some tools like the SXTCLI will require your private key to cryptographically sign authentication challenge tokens, but that private key itself is never transmitted.
Add a Wallet to your UserID, using Space and Time Studio
If you created a standard UserID in Space and Time Studio, you may optionally choose to associate a wallet extension.
You can associate a wallet address with an existing UserID, allowing you to easily authenticate to Space and Time with a ECDSA wallet signature (such as MetaMask) instead of username/password or ED25519 keypair.
Congrats! You've added your wallet address to your UserID, allowing you to login with your wallet!
These steps will associate your wallet address (aka public key) to your UserID's keychain. This means you can login with your wallet, but can also add and use other ED25519 keypairs, API Keys, UserName/Passwords, or even more than one wallet - all associated to the same UserID.
Add more than one Wallet to your UserID, using the SXTCLI
The Space and Time Studio allows users to easily add one wallet to their UserID, which is typically all most users need and very easy to accomplish in the Studio UI. Occasionally, users may want to add more than one wallets to their account - to do this, users can use the SXTCLI built-in ability to manage a UserID's keychain.
Adding a new web3 wallet your account requires authenticating once (to verify you are in control of the UserID) then registering the new wallet.
To add a new wallet to your account:
-
Gather your wallet's keys, both public (aka wallet address) and private key.
-
For the common wallet MetaMask, click on the extension, then on the three dots in the upper-right
-
Select the "Account Details" option from the drop-down menu to see this screen:

-
Your
PUBLIC_KEYis your wallet address, displayed directly under the QR code. -
Your
PRIVATE_KEYcan be revealed by clicking on the "Show private key" button. You may have to re-enter your wallet software password
-
Never share your private key with anyone - they can take over your account and steal your funds!
Never share your ACCESS_TOKEN with anyone - while only active for 30 minutes, it would allow anyone to access your full SxT account!
- Finally, use the <<sxtSXTCLI to complete the registration process:
sxtcli authenticate keychain \ --accessToken="eyJ0eXBlIjoiYWNjZXNzIiwia2lkIjoiZTUxNDVkYmQtZGNmYi00ZjI4LTg3NzItZjVmNjN..." \ --url="https://api.spaceandtime.app" \ add \ --privateKey="11ee85761391a6e23eefdd231b69f930ef3b492a538d11ea53882ee" \ --publicKey="0xa777dC80B19EA7831D73523A726462471db75e7B" \ --scheme=1- Paste your ACCESS_TOKEN over the sample in line 2
- Paste your Private Key over the sample in line 5
- Paste your Public Key (wallet address) over the sample in line 6
- The Schema for EVM Mainnet should be 1. For more information on wallet schema codes, see EIP-155
If successful, you'll receive the message: key added to keychain.
Congrats! You've successfully added a new wallet to your UserID's keychain!
You can add as many keypairs to your keychain as you'd like. For more information, check out this detailed article on connecting to the decentralized network.
To align with security best practices, Space and Time will never transmit your private key. Some tools like the SXTCLI will require your private key to cryptographically sign authentication challenge tokens, but that private key itself is never transmitted or stored.
Store your private key somewhere safe and private!
Join a Subscription
Subscriptions are a collection of Space and Time accounts, all using a singular payment method and shared visibility into each-other's objects. The most common use-case for subscriptions is a company or organization who pays for their employee's usage. Typically projects or smaller companies will have one subscription, while larger organizations may have several. An account can only belong to one subscription at a time.
There are several ways to become part of a subscription:
Join an Existing Subscription
If your organization already has an active Space and Time subscription that you'd like to join, your SxT admin must issue you a 'JoinCode'. The JoinCode they send you will look like a hexidecimal key, for example: 1115639b5baf85bba86153f8
No User_ID yet?
You will need a UserID before joining a Subscription - check out this page on creating a UserID. During the workflow to create a new UserID, there is a place to enter a joincode right when creating a new user - Done!
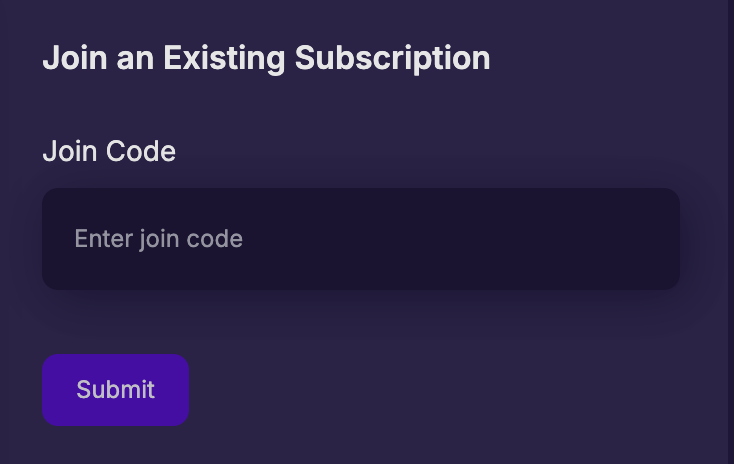
You should see a green confirmation message in the upper right, and this section of the UI will be replaced with information on you current subscription.
Congrats! You've just joined a subscription!
The JoinCode expires 24 hours after generation and is consumed once used (for security) - so don't delay!
Create a New Subscription
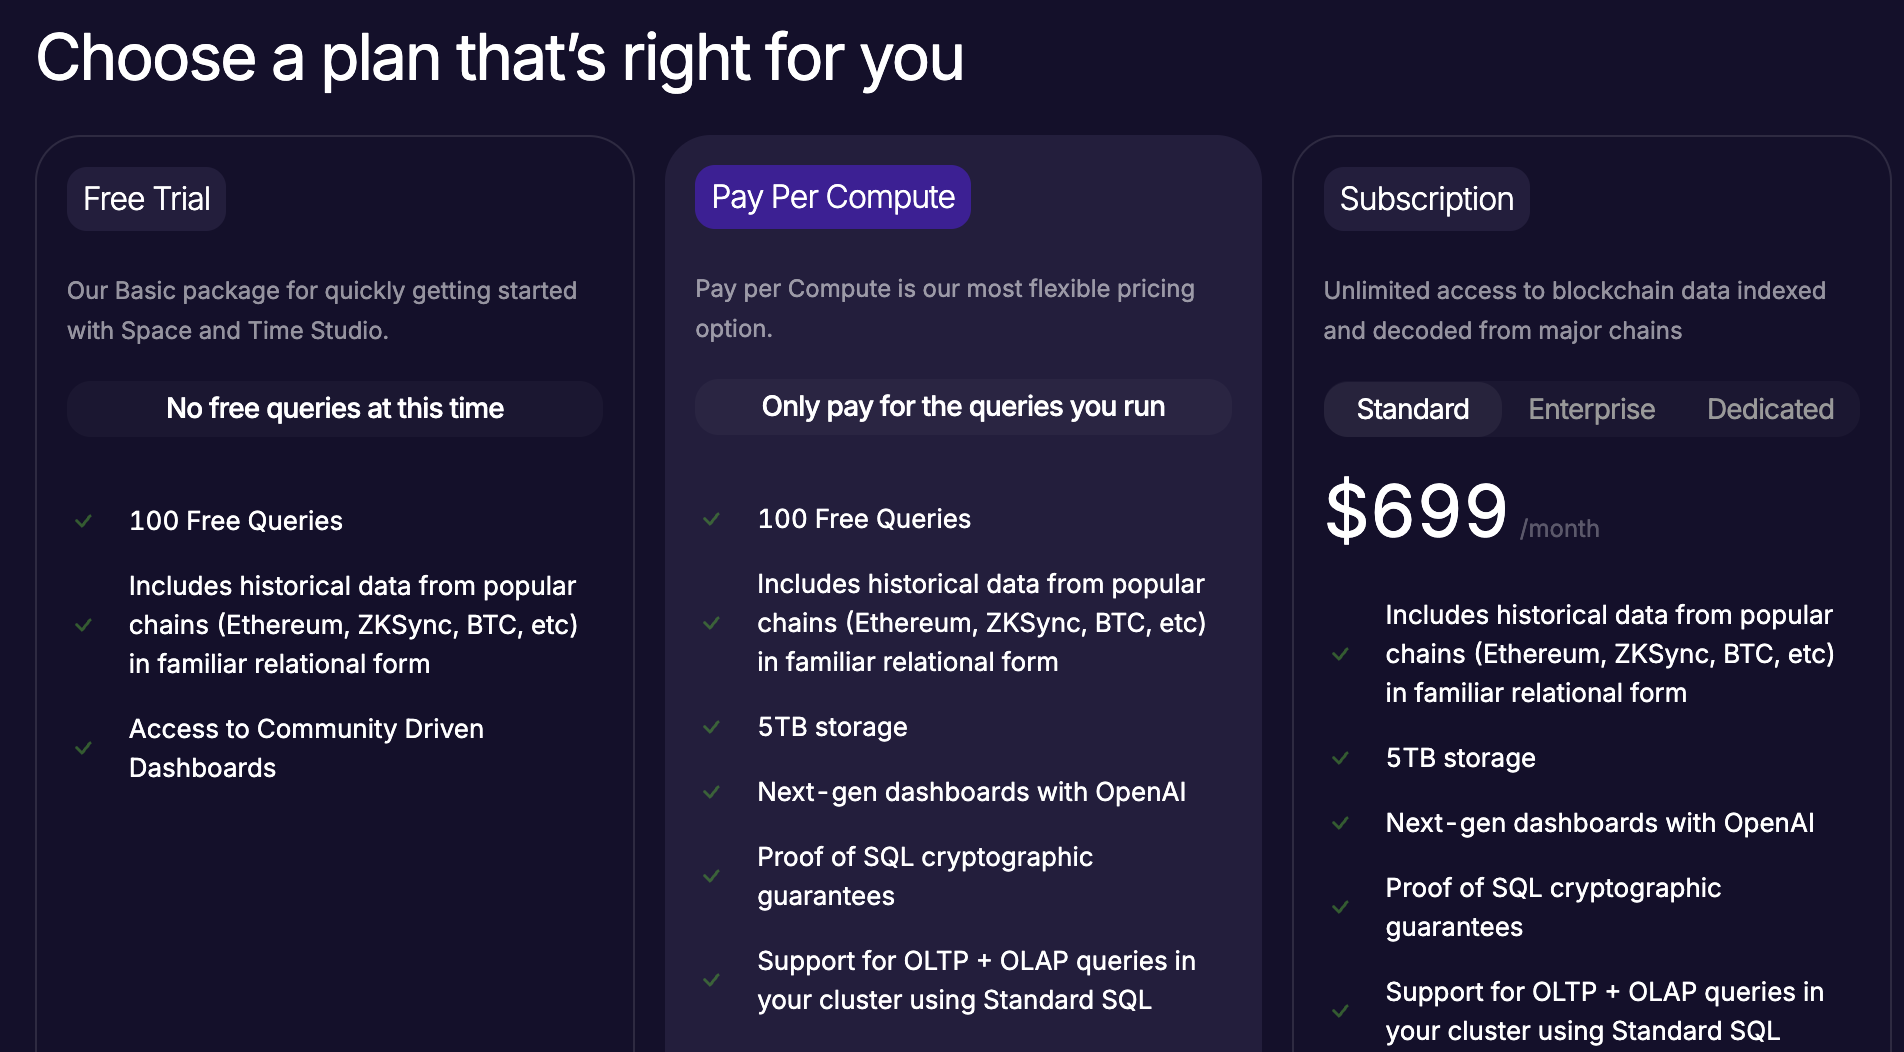
If you are the project founder or function owner, and new to the Space and Time network, you can decide what subscription type makes sense for your use-case and get signed up!
Types of Subscriptions
There are three types of subscriptions available today in the Space and Time network, each with different capabilities:
| Capability | Trial User | Price per Compute | Fixed Rate |
|---|---|---|---|
| Run Queries (AI, optimistic, or tamperproof) | 100 free queries (of any kind) | ✅ Only pay for compute used | ✅ Unlimited, for one fixed monthly cost |
| Create custom charts & dashboards | ✅ Create any number of custom charts and dashboards | ✅ Create any number of custom charts and dashboards | ✅ Create any number of custom charts and dashboards |
| Access Indexed Blockchain Data | ✅ Unlimited access to all indexed chains | ✅ Unlimited access to all indexed chains | ✅ Unlimited access to all indexed chains |
| Build Custom Smart Contract Indexing | ✅ Create up to 10 new custom indexing tables | ✅ Create up to 10 new custom indexing tables | ✅ Create up to 10 new custom indexing tables |
| Create custom tables and views | Cannot create custom tables | Can create small to medium tables | ✅ Create any number of any sized tables |
| Billing Method (multi-tenant) | Free | Charge per query, metered by CPU seconds used | Unlimited queires for one fixed monthly amount |
Check out our pricing page for the latest pricing. Also, if you're considering Price per Compute and looking to understand what different types of queries cost, check out this analysis on PPC .
There is no cost for data storage.
Create a New Subscription
Creating a new subscription is extremely simple using Space and Time Studio! Having a subscription opens up certain features (like creating tables) and higher performance, which are unavailable under the "Free Trial" version.
To create a new subscription:
- Navigate to Space and Time Studio, click on "Sign In" in the upper-right most corner, and log in.
Note: the UserID who creates the subscription will be the first "owner" and have full super-admin permissions.
- Click on "My Account" in the upper-right (replaces "Sign In") and click on "Account Settings".
- On the left side pane, click on "My Subscription" which will show your current plan - by default, that is "Free Trial" (aka no subscription). Since we're creating a new subscription, click on "upgrade plan" and select the plan that works best for you.
- Enter your credit card information (or coming soon, crypto payments!) to generate your new subscription!
Broadly speaking, there are two types of plans:
- "Fixed Rate" - select one of the fixed rate plans if you want predictable spend for known workloads. When selecting this subscription type, your card will be charged a prorated amount for the remaining time in the current billing cycle, then from that point forward monthly.
- "Pay per Compute" - select this usage-based plan to only pay for what you use, similar to Web3 gas or serverless apps. If you're not sure, this is a great way to get started at a low cost!
Another advantage of the Pay per Compute plan is the flexibility in how you want to manage your credits:

Congrats! You now have a Space and Time subscription!
Now that you have a subscription, you can add new members! Check out this page on generating and distributing JoinCodes to your team!
Find your Subscription ID
On rare occasionally you may need to reference your Subscription ID - for example, there is an initial soft-cap to the number of Users per Subscription. A simple request can increase that cap, however the process will require providing your Subscription ID.
To find your Subscription ID:
Click on "My Account" in the upper-right hand of the Space and Time Studio dapp and select "Pricing and Payments" to open your subscription page. Alternatively, you can click on "My Subscriptions" on the left-most selection pane from any "Account Settings" page.
Here you can find your Subscription Name, ID, current plan selected, billing amount and billing cycle. You can also change, leave, or cancel your subscription.
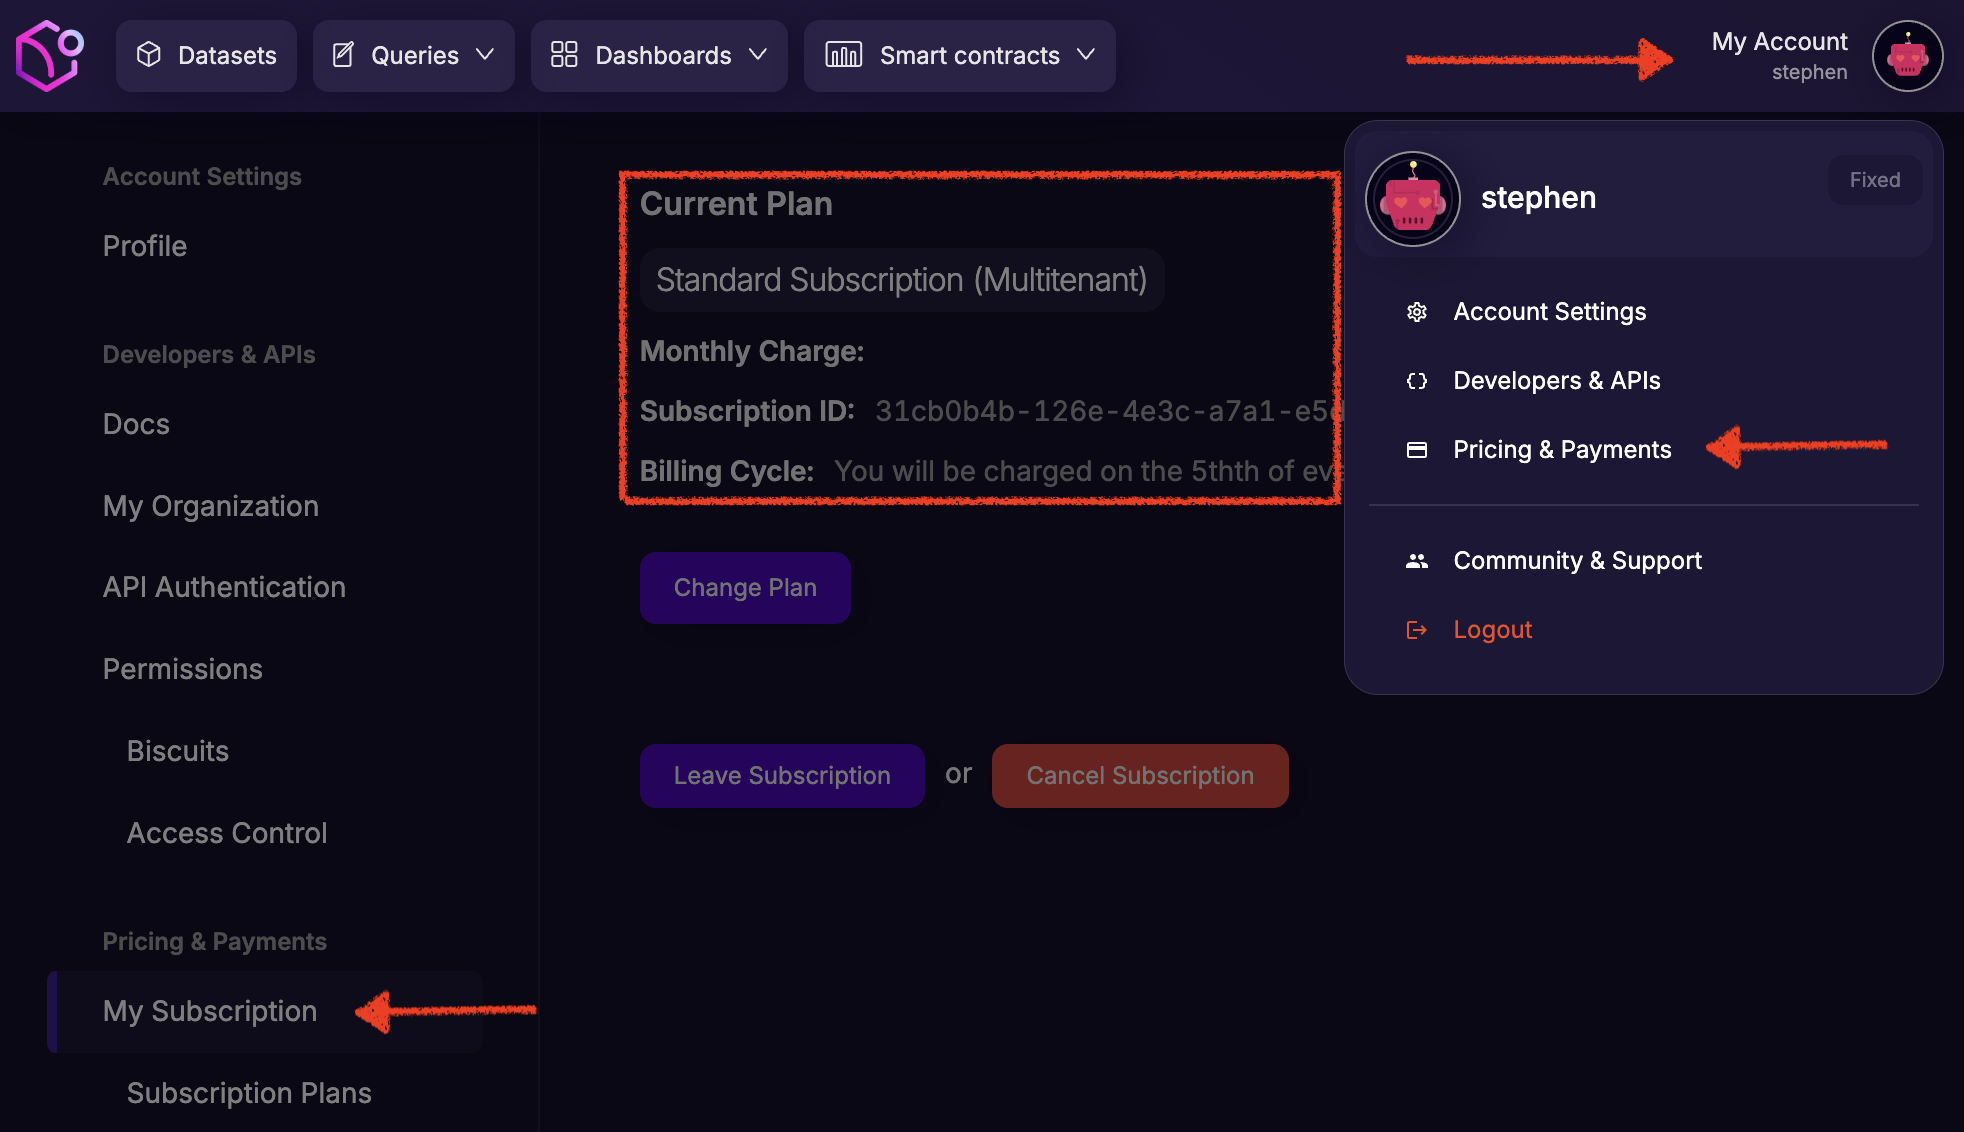
Only the "Owner" of a subscription can "Change Plan" or "Cancel Subscription." Any member of that subscription can "Leave Subscription," as that affects only the user, it does not change the subscription.
The Subscription ID is a UUID and acts as the unique identifier to your Subscription. Any changes to the Subscription requires an authenticated "Owner", so the Subscription ID by itself is not sensitive. That said, it's probably best not to share it too widely, just as a best practice.
Updated 4 months ago