
Publish to a Smart Contract (Chainlink Functions)
Publishing SxT query results on-chain using Chainlink Functions.
If you're new to Space and Time, we recommend following the Getting Started Guide to get familiar with the basic concepts first.
Chainlink, a partner of Space and Time, is a decentralized oracle network (DON) and Web3 services platform that allows developers to connect off-chain data to the blockchain in a trust-minimized way. SxT integrates with Chainlink so you can easily publish your SQL query results on-chain directly from SxT. Today, we support this in two ways:
Chainlink Functions
The easiest way to send query results to your smart contract, or publish data directly on-chain, is through our integration with Chainlink Functions. Functions provides access to off-chain computation without having to run and configure your own Chainlink Node. To pay for requests, you fund a subscription account with LINK.
Chainlink Functions is available on testnet only as a limited beta preview to ensure that this new platform is robust and secure for developers. You can apply for beta access here.
We also provide legacy support for Chainlink Direct Requests, which execute an oracle job upon receipt of an explicit request made by a user. The request is detected via a log emitted by an Oracle or Operator contract. This is similar to the legacy ethlog/runlog style of jobs.
What is Chainlink Functions?
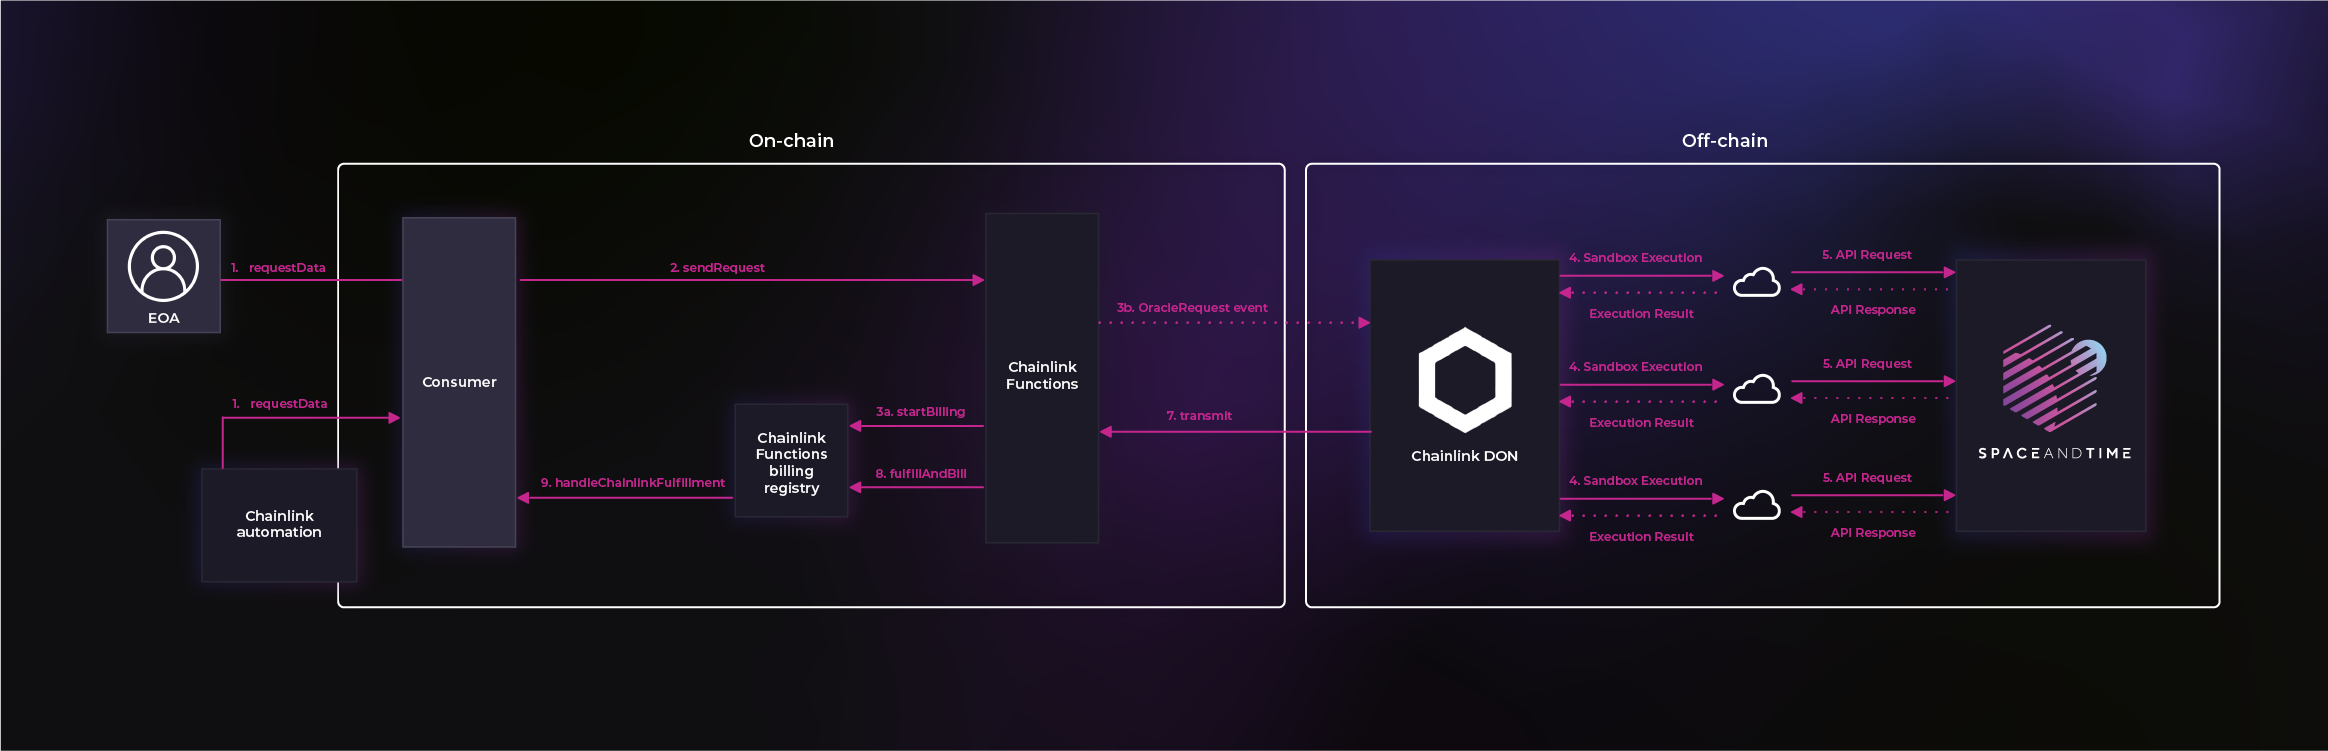
Chainlink Functions provides your smart contracts with access to a trust-minimized compute infrastructure. Your smart contract sends your code to a decentralized oracle network (DON), and each DON’s oracle runs the same code in a serverless environment. The DON aggregates all the independent runs and returns the final result to your smart contract.
At this time, Chainlink Functions is available as a limited beta preview only on testnet to ensure that this new platform is robust and secure for developers.
Overview of publishing a SxT query with Functions
Setup
Prerequisites
The easiest way to get started with Chainlink Functions is use their Hardhat Starter Kit. If you don't already have experience with Chainlink Functions, please start there and get setup on Polygon Mumbai. Once you have a working installation of Chainlink Functions, you can move ahead with the SxT customization.
Space and Time setup
1) Choose your table
For this example, we're going to pull data from a user-created table in Space and Time. You can also query on-chain data, or even run a more interesting query that joins on-chain and off-chain data, from the SxT data warehouse.
We're going to use a table with the resourceId: SE_PLAYGROUND.DNFT
It has a simple schema that looks like this:
[SE_PLAYGROUND.DNFT]
|Name|Type|Key|
|player_address|VARCHAR|true|
|player_score|INTEGER|false|
2) Connect SxT access token
If you need help generating an SxT access token, please see our Register and Authenticate page.
- Set ACCESS_TOKEN environment variable. We recommend using the Chainlink ENV ENC tool to manage your secrets -
npx hardhat env-enc setand addACCESS_TOKEN. - Load your SxT access token in
Functions-request-config.jsby adding the following line:
secrets: { accessToken: process.env.ACCESS_TOKEN ?? "" },
3) Customize Functions config file
Inside the same Functions-request-config.js file, we need to make two more changes:
- Add our
sqlTextandresourceIdby commenting out an line, and adding a line like this:
// args: ["1", "bitcoin", "btc-bitcoin", "btc", "1000000", "450"],
args: ["SELECT player_score FROM SE_PLAYGROUND.DNFT_0", "SE_PLAYGROUND.DNFT_0"],- Point to a new SxT Request Config:
Comment out the example, and add a line below like:
//source: fs.readFileSync("./calculation-example.js").toString(),
source: fs.readFileSync('./query-space-and-time.js').toString(),
4) Create new SxT request config file
As we can see above in the Functions-request-config.js file, we're reading this file into the main config. This file will contain specific information about the request that the Chainlink DON will run.
Create a new file to match the one we've included above. For example: query-space-and-time.js
// Import our variables from Functions-request-config.js
const sqlText = args[0]
const resourceId = args[1]

// Make a POST request to the SxT API
const response = await Functions.makeHttpRequest({
  url: "https://<SxT-API-URL>",
  method: "POST",
  timeout: 9000,
  headers: {
    'Authorization': `Bearer ${ secrets.accessToken }`,
    "Content-Type": "application/json"
  },
  data: { "resourceId": resourceId, "sqlText": sqlText }
})

// Extract the data we want from the response
const responseData = response.data
const arrayResponse = Object.keys(responseData[0]).map((key) => `${responseData[0][key]}`);

// Helpful for debugging
console.log("Full response from SxT API:", response)
console.log("Value we'll send on-chain:", parseInt(arrayResponse[0]));

return Functions.encodeUint256(parseInt(arrayResponse[0]));
Deploy contracts and create Functions sub
- For the sake of simplicity, we're not going to make any modifications to the boilerplate Chainlink
FunctionsConsumer.solcontract. So, all we need to do is deploy the contract:
npx hardhat functions-deploy-client --network mumbai --verify trueThis command will return the <contract-address> on Mumbai, which you'll need for the next step. For ease of use, it's a good idea to load the contract address into an environment variable like CONTRACT_ADDRESS.
- Create CL Functions Subscription
npx hardhat functions-sub-create --network mumbai --amount 5 --contract $CONTRACT_ADDRESSThis command will return a subscription ID. You can either set an envar for SUB_ID or take note of the subscription ID for the next step.
While the amount of LINK needed to run a request will vary based on the size of the response (and other factors), at the time of this writing, a basic request that returns a single integer cost about .2 LINK per request. If you run out of LINK for a given subscription, you can always add more with the
functions-sub-fundcommand.
Execute SxT query with Functions
Test It Out
You can test your configuration locally using this function:
npx hardhat functions-simulateThis is great way to identify any issues before interacting with the chain directly.
Initiating the request
Now we are ready to query Space and Time and publish the results on-chain!
Chainlink Functions has a handy helper to initiate requests using an EOA account and it can be invoked like this:
npx hardhat functions-request --network mumbai --contract $CONTRACT_ADDRESS --subid $SUB_IDUpdated 9 months ago